How xa11y works
xa11y is a cross-platform library for reading accessibility trees and acting on them. It also subscribes to accessibility event streams, and can synthesise low-level input or capture screenshots.
This page explains the model, and the code here illustrates concepts rather than prescribing steps. The tutorial is the guided path, the guides are the recipes, and the API reference has the signatures.
What is desktop accessibility?
Section titled “What is desktop accessibility?”Most desktop applications expose an accessibility tree, a structured representation of their interface intended for screen readers and other assistive technology. Each platform has its own API for this (macOS AXUIElement, Windows UI Automation, Linux AT-SPI2), and the underlying concepts are the same. xa11y provides a single API that works with all of them.
That inheritance is the source of both xa11y’s strengths and its limits. The application publishes the data itself, which makes it semantic rather than pixel-derived. A button is labelled a button because the application says so. By the same token, an application that publishes nothing stays invisible to xa11y, and no amount of cleverness in the library changes that.
An accessibility tree mirrors the visual hierarchy of an application. Here’s what one looks like:
[0] application "Calculator" [1] window "Calculator" [2] group "Display" [3] static_text "Result" value="42" [4] group "Keypad" [5] button "7" [6] button "8" [7] button "9" [8] button "+" [9] button "4" ...Every element in the tree has properties. Here’s the full data for
button "+":
role: buttonname: "+"value: Nonestates: enabled, visiblebounds: (272, 200, 80, 40)actions: press, focusActions
Section titled “Actions”Accessibility APIs expose the operations an element supports, from pressing a button or typing into a field to expanding a menu and scrolling a pane. xa11y offers all of these through a unified action API.
Input simulation
Section titled “Input simulation”For the small set of gestures with no accessibility equivalent (drag-and-drop,
scroll wheels, global shortcuts) xa11y also offers an
InputSim façade that synthesises OS-level pointer and
keyboard events. Input simulation lives in its own surface
(xa11y::input_sim() / xa11y.input_sim() / inputSim()) and never falls
back from an accessibility action automatically. Prefer locator.press() and
locator.type_text() whenever they work.
Screenshots
Section titled “Screenshots”xa11y captures pixel-level snapshots of the full screen, an explicit region, or the area behind an accessibility element. This is useful for attaching visual evidence to test failures or feeding vision-language models the same frame the agent is reasoning about. See the Screenshots guide.
Events
Section titled “Events”Accessibility APIs also emit events when the interface changes: elements appearing or disappearing, focus moving, names or values updating. Clicking a text field might emit:
FocusChanged app="Calculator" target=text_field "Display"xa11y supports subscribing to these event streams per-app via
app.subscribe(). The full list of event types, and where each platform has
gaps, is in Events.
How does xa11y compare to other tools?
Section titled “How does xa11y compare to other tools?”xa11y reads accessibility trees from the outside, across all three desktop platforms, through one API. That distinguishes it from single-platform libraries such as pywinauto and FlaUI, and from pixel-matching tools such as SikuliX. It also differs from AccessKit, which publishes a tree rather than consuming one.
See the comparison page for the full landscape, capability tables, and when to choose something else.
Concepts
Section titled “Concepts”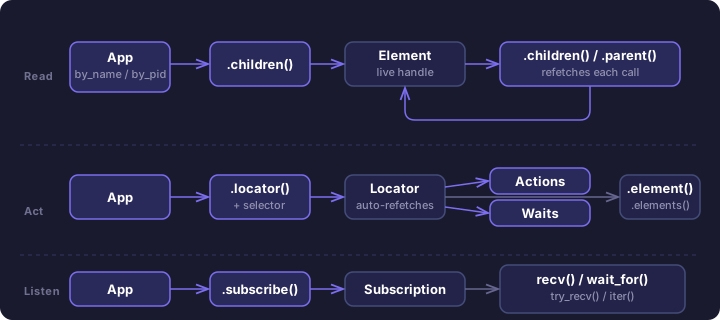
xa11y is built around a small set of types:
- App is the entry point for driving an application. Construct via
App::by_name(),App::by_pid(),App::find()(predicate-based discovery), orApp::list(). An App offersapp.children()for tree navigation,app.locator(selector)for actions and waits, andapp.subscribe()for event streams. - Element is a live handle to a node in the accessibility tree. Navigate with
children()andparent(), where each call queries the platform lazily. Read properties likerole,name,value,states,bounds. Capture the subtree as a structured snapshot withtree(max_depth)or as an indented string withdump(max_depth). Actions (press(),set_value(), etc.) are available too, acting on the captured handle without re-resolution or auto-wait. - Locator is a lazy selector that re-resolves on every operation. Use for actions (
press(),set_value(), and others), waits (wait_visible(), and others), and querying (element(),elements()). Auto-waits for visible+enabled before acting and is the recommended path for most code. Inspired by Playwright’s Locator pattern. - Subscription is a live event stream from an app. Created via
app.subscribe(). Pull events withtry_recv(),recv(timeout),wait_for(predicate, timeout), or iterate withiter(). Drop to unsubscribe. - Selector is the CSS-like query syntax used by Locator. Supports role matching, attribute filters, combinators, and nth selection. The syntax is documented in Selectors.
Connecting to an app
Section titled “Connecting to an app”An application is reached by name, by process ID, or by a predicate over the running set. The name and PID forms poll, because an application launched moments ago has usually not registered with the accessibility API yet.
use xa11y::*;use std::time::Duration;
// Connect by name. The second argument is a polling timeout —// useful when the app may not yet be registered with the a11y API.// Pass `Duration::ZERO` for a single attempt with no waiting.// (Returns PermissionDenied if accessibility is not enabled.)let safari = App::by_name("Safari", Duration::from_secs(5))?;
// Connect by PIDlet app = App::by_pid(1234, Duration::from_secs(5))?;
// Connect by predicate — polls until some running app matches.// Use when neither name nor PID alone identifies the target.let app = App::find(Duration::from_secs(5), |a| {    a.pid == Some(1234) && a.name.as_deref().unwrap_or("").starts_with("My App")})?;
// List all running apps (single enumeration, no polling)let all = App::list()?;
import xa11y
# Connect by name (raises PermissionDeniedError if accessibility is not enabled)safari = xa11y.App.by_name("Safari")
# Connect by PIDapp = xa11y.App.by_pid(1234)
# Connect by predicate — polls until some running app matches.# Use when neither name nor PID alone identifies the target.app = xa11y.App.find(lambda a: a.pid == 1234 and a.name.startswith("My App"))
# List all running apps (single enumeration, no polling)all_apps = xa11y.App.list()import { App } from '@crowecawcaw/xa11y';
// Connect by name (throws PermissionDeniedError if accessibility is not enabled)const safari = await App.byName('Safari');
// Connect by PIDconst app = await App.byPid(1234);
// Connect by predicate — polls until some running app matches.// Use when neither name nor PID alone identifies the target.const app2 = await App.find( (a) => a.pid === 1234 && a.name.startsWith('My App'), { timeout: 5000 },);
// List all running apps (single enumeration, no polling)const all = await App.list();Reading accessibility data
Section titled “Reading accessibility data”Lazy navigation
Section titled “Lazy navigation”app.children() returns the top-level elements (typically windows). Each
Element supports children() and parent() for further navigation. Every
call queries the platform lazily, so you always see the current state of the
interface.
let calc = App::by_name("Calculator", Duration::from_secs(5))?;let windows = calc.children()?;
let children = windows[0].children()?;let parent = children[0].parent()?;
// Read properties (via Deref to ElementData)println!("{} — {}", children[0].role, children[0].name.as_deref().unwrap_or(""));
calc = xa11y.App.by_name("Calculator")windows = calc.children()
children = windows[0].children()parent = children[0].parent()
# Read propertiesprint(f"{children[0].role} — {children[0].name or ''}")const calc = await App.byName('Calculator');const windows = await calc.children();
const children = await windows[0].children();const parent = await children[0].parent();
// Read propertiesconsole.log(`${children[0].role} — ${children[0].name ?? ''}`);An element carries the semantic properties the application published: its role, name, value, description, bounds, state flags, and the list of actions it supports. Locator & Element has the full set, and most of them double as selector attributes.
name, value, and description are stripped of Unicode bidi format controls
(LRM, RLM, embeddings, isolates) so that equality assertions match the logical
text. The unstripped platform string is preserved on element.raw under the
platform-native key (AXTitle/AXValue/AXDescription/AXHelp on macOS,
atspi_name/atspi_value/atspi_description on Linux,
uia_name/uia_value/uia_help_text on Windows).
Elements are live
Section titled “Elements are live”Every call to children() or parent() queries the platform. There are no
cached snapshots, so you always see the latest tree state.
let windows = calc.children()?;println!("{:?}", windows[0].children()?[0].name);  // queries platform
// UI changed? Just navigate again:let windows = calc.children()?;                     // fresh query
windows = calc.children()print(windows[0].children()[0].name) # queries platform
# UI changed? Just navigate again:windows = calc.children() # fresh querylet windows = await calc.children();console.log((await windows[0].children())[0].name); // queries platform
// UI changed? Just navigate again:windows = await calc.children(); // fresh queryTo find specific elements, use a Locator (below), which uses CSS-like selectors to find elements efficiently.
Subtree snapshots
Section titled “Subtree snapshots”element.tree(max_depth) captures the subtree rooted at an element as a
recursive data structure (role, name, value, children).
element.dump(max_depth) formats the same snapshot as an indented string,
which is useful for debugging and test diagnostics. Both accept an optional
max_depth argument: 0 returns only the root node, 1 includes its direct
children, and so on. Omit for the full subtree.
A snapshot is a copy, unlike the live handles above, and that is the point of it. It can be printed, diffed, or attached to a failure report without the underlying tree shifting underneath. See Find the right selector for how it is used in practice.
let dialog = app.locator("dialog").element()?;println!("{}", dialog.dump(Some(3))?);// dialog "Settings"// group "General"// check_box "Enable notifications"// check_box "Start at login"dialog = app.locator("dialog").element()print(dialog.dump(max_depth=3))# dialog "Settings"# group "General"# check_box "Enable notifications"# check_box "Start at login"
node = dialog.tree(max_depth=1)# {"role": "dialog", "name": "Settings", "value": None, "children": [...]}const dialog = await app.locator('dialog').element();console.log(await dialog.dump(3));// dialog "Settings"// group "General"// check_box "Enable notifications"// check_box "Start at login"
const node = await dialog.tree(1);// { role: 'dialog', name: 'Settings', value: undefined, children: [...] }Taking actions
Section titled “Taking actions”Locators
Section titled “Locators”A Locator holds a selector and re-resolves on every operation. Create one
via app.locator(selector). Actions always target the current state of the
interface.
let calc = App::by_name("Calculator", Duration::from_secs(5))?;let btn = calc.locator("button[name='=']");
// Each call re-resolves the selector, finds the element, then actsbtn.press()?;
// Read properties via .element()let element = btn.element()?;println!("{:?}", element.name);
// Wait for state changes (polls until condition met)btn.wait_enabled(Duration::from_secs(5))?;
// Get all matching elementslet buttons = calc.locator("button").elements()?;println!("Found {} buttons", buttons.len());
calc = xa11y.App.by_name("Calculator")btn = calc.locator("button[name='=']")
# Each call re-resolves the selector, finds the element, then actsbtn.press()
# Read properties via .element()element = btn.element()print(element.name)
# Wait for state changes (polls until condition met)btn.wait_enabled(timeout=5.0)
# Get all matching elementsbuttons = calc.locator("button").elements()print(f"Found {len(buttons)} buttons")const calc = await App.byName('Calculator');const btn = calc.locator("button[name='=']");
// Each call re-resolves the selector, finds the element, then actsawait btn.press();
// Read properties via .element()const element = await btn.element();console.log(element.name);
// Wait for state changes (polls until condition met)await btn.waitEnabled(5);
// Get all matching elementsconst buttons = await calc.locator('button').elements();console.log(`Found ${buttons.length} buttons`);A Locator offers four families of operation: the action verbs, the wait_*
family, the queries (element, elements, exists, count), and the
chaining methods that narrow one locator into another.
Locator & Element lists all of them.
A selector specific enough to survive the interface growing another button is
worth the extra characters. button alone can start matching the wrong element
once the application grows a second one, so scope it to the group or window
that contains the one you mean.
Element actions
Section titled “Element actions”The same action verbs are also available directly on Element. A Locator
re-resolves its selector and auto-waits for the element to be visible and
enabled before acting; an Element acts on the snapshot you already captured,
with no re-resolution and no auto-wait. If the underlying element has been
destroyed since you fetched it, the call returns an ElementStale error.
Reach for Element actions when you’ve already inspected an element, typically
after .dump() or reading .actions, and want to act on that same instance.
For everything else, use a Locator, which stays correct across UI changes and
is the path most code should take.
// Locator: re-resolves and auto-waits — robust for changing UIs.calc.locator("button[name='Save']").press()?;
// Element: acts on the captured snapshot — useful when you've already// inspected the element and want to act on the same instance.let btn = calc.locator("button[name='Save']").element()?;println!("{:?}", btn.actions);  // ["press", "focus"]btn.press()?;
# Locator: re-resolves and auto-waits — robust for changing UIs.calc.locator("button[name='Save']").press()
# Element: acts on the captured snapshot — useful when you've already# inspected the element and want to act on the same instance.btn = calc.locator("button[name='Save']").element()print(btn.actions) # ["press", "focus"]btn.press()// Locator: re-resolves and auto-waits — robust for changing UIs.await calc.locator("button[name='Save']").press();
// Element: acts on the captured snapshot — useful when you've already// inspected the element and want to act on the same instance.const btn = await calc.locator("button[name='Save']").element();console.log(btn.actions); // ["press", "focus"]await btn.press();Reach for Locator first. Auto-wait and selector re-resolution make Locator
resilient to tree changes between operations. Use Element actions only when
you already hold the element and want to act on that exact instance.
Which platform API each verb dispatches to is in Platform Details, and the rule that keeps a verb honest is design tenet 3, action fidelity.
Where to go next
Section titled “Where to go next”- Locator & Element lists every method and property.
- Selectors is the query syntax in full.
- Events is the event stream in full.
- Errors lists every error variant, and Errors and diagnosis explains what a failure tells you.
- Accessibility API Quirks is the field guide to what the platforms and toolkits underneath actually do.
- Architecture & Design covers the internals and the design tenets.